Five Takeaways From Almost Failing Resin Beach Coasters
- Simply Jelly Jam
- Oct 5, 2021
- 6 min read
Mistakes made are lessons learned.
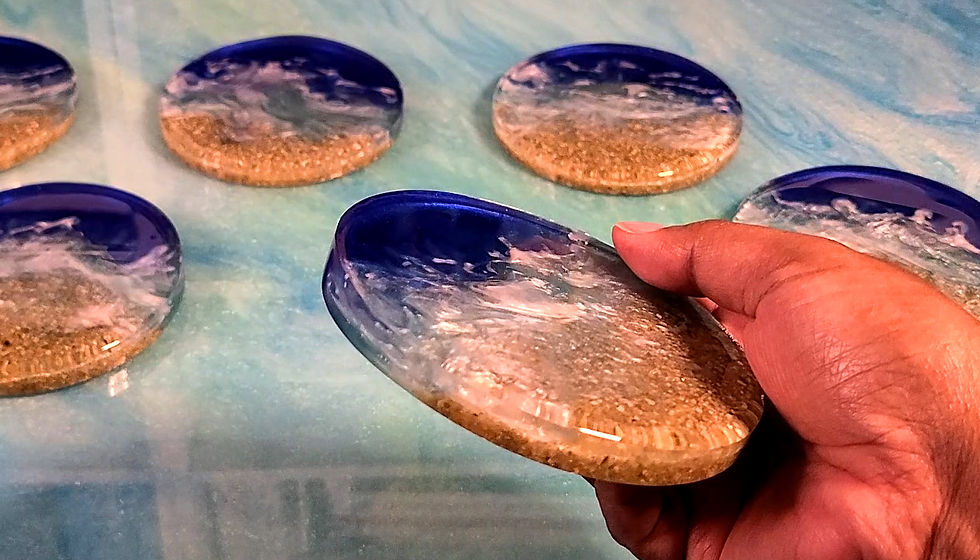
I recently completed round beach-themed epoxy resin drink coasters. While they looked alright, mistakes were made. I thought I'd share my five takeaways from this resin craft project.
I Got Overconfident
After making successful beach-themed tags as showcased in my Resin Pet Tags post, I caught the "beach resin bug" and wanted to make more!
NOTE: The "beach resin bug" is a fictional bug. It's not real. I made it up. If it were real, it would probably look beautiful and glossy!
I used my six cavity silicone round disc mold to create beach-themed drink coasters. It's a decent mold to make coasters and flat ornaments with, but the 'walls' are thin and flimsy. It's great for resin craft practice and personal items, but I'll buy sturdier, thicker molds when I make drink coasters as gifts for family.
Anyway, I believed since my first beach resin attempt was successful, I knew what I was doing. However, I made several mistakes the reminded me that I shouldn't get cocky about my novice skill level.
Fortunately, my mistakes didn't lead to wasted epoxy resin. Any issue could be fixed with sanding and/or more resin.
While editing my video for YouTube, I realized five main takeaways that are now lessons learned.
#1. Always Check Levels
It's important to check the levels of both the tabletop surface and molds you're working with. Epoxy resin self-levels on its own, but it won't level properly if it's not poured onto or over a flat, level surface.

I usually do this, but it never crossed my mind when I started this resin project. My subconscious was focused on an upcoming two-week trip. I realized my mistake when I saw thinner resin flowed away from me.
Not working on a flat, level surface resulted in an uneven resin piece. I could see from holding a resin piece that the table sloped away from me. There was less resin around the beach sand and more resin around the darker blue of the ocean.

Unfortunately, I forgot to check the levels when I domed the tops. I didn't realize it until the clear resin flowed away from me.
Despite having sanded the pieces to make them more even and level, forgetting to check the levels before I domed the tops resulted in the pieces not being leveled once again.
#2. Beach Resin Projects Take Time
If you've watched mine or other beach-themed resin craft projects online, there's a good chance the edited videos don't truly represent the total amount of time it takes to make a decent beach resin piece.
The beach resin pet tags I made a few months ago took me over an hour to make not including sanding and doming the pieces on a different day. This time included mixing resin, letting the resin sit undisturbed to thicken (and ponder life choices), pouring the resin into the molds, and using tools to either push the resin around (because I'm a resin bully) or add details to achieve the look I wanted.
This was the same for the beach resin drink coasters I recently made. The different elements of a beach-themed design (i.e., sand, shallow water, deep ocean water, and waves) are added in phases.
While I attempted to create the coasters and complete each phase in one sitting, most advanced and more talented resin crafters focus on only one phase at a time. For example, they'll focus only on creating the sandy beach of their pieces and let it set for some time before mixing a new batch of resin to create the shallow water.
In fact, most resin crafters would add layers of white resin to create depths of waves after hours or days of letting the resin set. This is a significant amount of time before they dome the top of their projects for that finishing touch.
I didn't apply enough patience to focus on the quality of details. My impatience almost ruined the design of my pieces.
#3. Don't Rush
Don't rush what you're doing. Have patience and take things slow as needed. The multiple phases that go into making a beach resin design is a great example of the old proverb, "patience is a virtue." In other words, having patience may result in creating a great resin piece.
After I realized my first small batch of white resin was too thick to work with, I didn't let the second batch set long enough to thicken. As I meticulously poured it over clear resin to help spread the color as I continued working with it, the resin was so thin that it blended into the clear resin. I couldn't make some sharper, distinct white marks on the pieces.
I should've stopped and waited for the white resin to thicken as soon as I noticed my problem, but I was too impatient to wait. Because I rushed to get it done, I lost the detail of the waves I wanted to have on my pieces.
#4. Some Attempts May Fail
As I mentioned earlier, I got cocky after my first beach resin project was successful. I figured I knew what I was doing and was good-to-go for making other beach resin projects.
Yet, small and large differences in crafting techniques, tools and supplies, environment conditions, and other factors could impact the final product results.
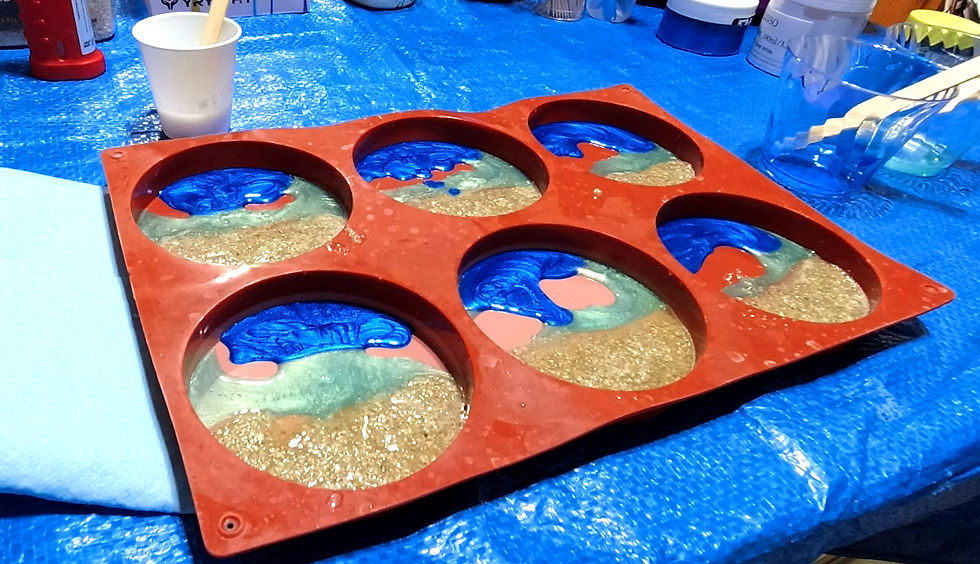
For example, I used a larger and thinner mold than the pet tag molds I used previously. I was filling larger cavities and using more epoxy resin, pigment ink, beach sand, and mica powders than the previous time. This meant there was a more room for error.

Since this was my first-time making beach resin drink coasters, I underestimated how much resin I needed to fill the voids. I ended up not mixing enough of the blue colored resin (shallow water and deep ocean water) to fill the cavities completely.
The beach resin drink coasters didn't look the way I wanted them to. This is because I didn't check levels before starting, I didn't devote enough time to achieve a better design, I rushed at the end instead of applying patience, and I haven't practiced enough to improve my techniques.
The educator in me believes practice is key to skill improvement and better-quality assurance. I'll make more beach resin projects to practice, but I'll try different techniques for different products to learn what works best for me.
#5. Try New Techniques
Sometimes there are different ways to achieving a single end goal. This is often the case with most arts and crafts projects, including resin crafts. Depending on what you're creating, using different techniques may be necessary for creating a design.
While I was able to successfully make my beach resin pet tags in one sitting and without pause, this wasn't the best option for the beach resin drink coasters I recently made.
I'll attempt this resin project again, but I'll do things differently to see what works best for me. I would love to make a set for family living by the waters in Florida.
Even if you think one technique works well for you, take a risk and try a different technique for grins. Maybe you'll discover a technique you like better.
My Thoughts
![[Mostly] Finished Beach Drink Coasters](https://static.wixstatic.com/media/2cd323_58b5b011411247c29fbbd3362db714e0~mv2.jpg/v1/fill/w_980,h_437,al_c,q_85,usm_0.66_1.00_0.01,enc_avif,quality_auto/2cd323_58b5b011411247c29fbbd3362db714e0~mv2.jpg)
I think any opportunity to practice and try different techniques is critical for improvement. Yet, epoxy resin isn't cheap, and mistakes could be costly.
I'm lucky I didn't completely ruin these pieces. With effort, I should be able to fix these and have a full set of beach resin drink coasters for my home. I believe I'll need to sand and add another thin layer of resin over the tops of each piece.
I wondered if the mold I used to make the beach resin drink coasters were too flimsy to lay flat on the tabletop. After my initial draft of this post, I started making Halloween-themed drink coasters using a thick, sturdier silicone mold made for use with resin.
I checked the level of my folding tabletop in many directions before starting my first pour. All was good, so I started a new set of epoxy resin drink coasters.
However, the pieces were also uneven and not leveled. I wondered if the folding table I used as my work surface had dips that I couldn't see or identify with my level. I'll try using a different tabletop next time around.
What's Next?
I'm working on another set of drink coasters with a Halloween theme. I hope to share this resin craft project with you within the next couple weeks.
What are some resin craft lessons you've learned from experience? Login and Sign up to share your tips and takeaways for resin crafts.
Don't forget to subscribe below to be notified by email when I post something new.
Thanks, and have a great day!
Simply Jelly Jam
Comments