Making a couple "flocking fabulous" greeting cards!

I wanted to make a greeting card for a friend, so I used some sheets from a couple Hot Buy paper packs I had to make a flamingo-themed design. I went ahead and made two greeting cards, one with heat embossing. I also decorated the inside of the envelopes.
Continue reading to see the steps I took to create a couple flamingo greeting cards.
Supplies and Stuff
These are the items I used to create my card:
Paper trimmer and score tool. I used a paper trimmer to measure, cut, and score the paper. A simple pair of scissors and a ruler will do the same if you want to try this at home. You also don't need a score tool. A simple fold of the cut paper in half will do the job. Then use your finger or some other tool, like the scissors' handle, to flatten the fold if preferred.
Heavy cardstock paper. I used a solid hot pink cardstock paper.
Patterned paper sheets. I used a couple sheets from a Tropic Vacation Hot Buy paper pad from Michael's.
Pencil and brush marker. I used a pencil and Tombow black brush marker to write a sentiment on the front of one card. I also used a pencil to mark where I wanted to make cuts on different sheets of paper.
Double-sided tape. I used a permanent double-sided tape runner to adhere the different pieces of paper onto the cards and envelopes. I also used permanent double-sided tear tape on the envelope flap for Card #2.
Envelopes. I had a couple envelopes; one for each greeting card I made.
Paper cutter and scissors. I used a paper cutter to make most of the cuts, but I also used scissors to trim excess paper around the edges of the cards and envelope flaps.
Embossing brush pen and powder. I traced over my handwritten sentiment with a VersaMark dual brush. I then poured Ranger black embossing powder over the sentiment I traced with the embossing brush pen.
Heat gun. I used a heat gun to solidify the embossing powder.
Card #1: Measure, Cut, and Score the Card Base
Before I started this craft project, I knew I wanted a summer-like design to send to my friend. I pulled out my Tropic Vacation Hot Buy paper pack and flipped through the sheets to see what design I wanted to work with. I came across a pink sheet with a flock of flamingos across the bottom that I knew I wanted to use for this greeting card.


I pulled a blue-to-green sheet from the paper pack. I thought the flock of flamingos would look good and contrast well over these colors.


I cut gradient sheet down to 8-1/2" x 5-1/2", and then scored it at 4-1/4" to create a clean card fold. I used the score tool to flatten the fold. This served as the card base.
I put the excess aside and used it for the card base of the second card referenced later in this blog.
Card #1: Decorating the Card Front


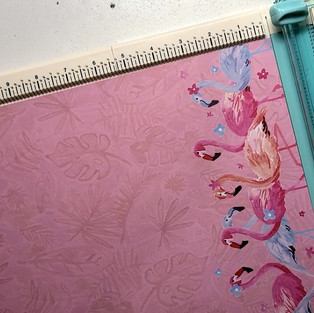


For the front of the card, I cut the flock of flamingos from the rest of the design sheet pulled from the paper pack. I then cut the strip of flamingos down to 4-1/4" in length making sure not to cut through a flamingo's head (because I'm anti-head decapitation).
I put the excess strip of flamingos aside and used it for the second card referenced later in this blog.


I didn't feel there was enough visual interest between the card base and strip of flamingos. I cut a sheet of solid hot pink cardstock down to a size slightly larger than the strip of flamingos. I chose this color because it closely matched a few of the colors on the strip of flamingos' sheet of paper.
Initially, I thought about having the design cover most of the card front. However, I decided to include a handwritten sentiment to the card front. I trimmed the height of the strip of flamingos and hot pink cardstock until I felt I had enough room on the card front to write a sentiment.


I used a permanent double-sided tape runner to first adhere the strip of flamingos onto the hot pink cardstock, and then I adhered the hot pink cardstock to the card front. The strips of paper hung over an edge of the card base which I cut off with scissors.


I sketched the word "hello" as the sentiment over the blank area of the card front. When I was satisfied with how it looked, I traced over the sketch with a black brush marker. I had no regrets adding the sentiment, and I'm happy I made myself another opportunity to practice my brush lettering.
Card #1: Heat Embossing a Sentiment
While I could've left the card front as-is, I decided to heat emboss the sentiment to add texture. I placed a sheet of wax paper under the card base to ensure a clean work surface and collect excess embossing powder.


I re-traced over the sentiment with an embossing brush pen. This ink served as an adhesive of sorts for the embossing powder. I poured black embossing powder over the sentiment, let it sit for a while, and then shook off the excess powder onto the wax paper. I rolled the wax paper into a funnel shape to pour the excess embossing powder back into its container.
I should've used a brush, Q-Tip, or even my fingers to remove specks of embossing powder from around the sentiment. Unfortunately, I didn't think about it at the time. I turned on my heat gun and let it heat up for a minute before using it on the card front.

Once my heat gun had a minute to heat up, I held it a couple of inches above the sentiment while moving the heat gun in a sweeping motion. I found from experience that moving the heat gun opposed to keeping it stationary prevents burning the paper.
When the paper started to warp slightly, I used the heat gun on the flip side of the card front. I found that this minimizes the amount of warping excessive heat causes to paper, especially since I tend to use the heat gun a bit close to the paper's surface.
It took a couple minutes before the embossing powder solidified and rose in size, creating the texture I wanted.

However, several unwanted specks of the embossing powder adhered to the area surrounding the sentiment. I unsuccessfully tried scraping it off. When the scraping didn't work, I added random black dots with my black brush marker to mask the error I made.
Card #1: Decorating the Envelope
Instead of decorating the outside of the envelope as I've done in past blog posts, I decided to decorate the inside of the envelope. I wanted to use the excess part of the pink sheet that had the flock of flamingos across the bottom.


I placed the sheet over the envelope and below the sticky part of the envelope's flap that you wet to seal the envelope. I used a pencil to mark the edges of the envelope on the sheet so that I knew where to make my initial cuts.
I didn't measure the sheet, although I probably should've to make things easier for me. Instead, I kept trimming the sheet until it fit into the envelope with ease.


I scored the sheet only to realize I didn't cut the sheet properly, and so I ended up trimming a lot more than I needed to in the end.
Once I got the shape right, and the sheet fit well inside the envelope, I adhered the sheet to the envelope's flap only. This allowed the sheet to move with ease when I or my friend opened and closed the envelope.
Now for Card #2...
Card #2: Measure, Cut, and Score the Card Base
For the second card, I knew I was using a different sized envelope and needed to make a greeting card to fit it. I had a 6-1/4" business envelope I wanted to use.


For the card base, I cut the excess gradient sheet down to 7" x 6-1/4". I then scored it at 3-1/2" to create a clean card fold. I used the score tool to flatten the fold.
Card #2: Decorating the Card Front


I trimmed the excess strip of flamingos in height to better fit the card front. This strip doesn't match the length of the card base, but that didn't bother me.
I cut the excess sheet of solid hot pink cardstock down to a size slightly larger than the strip of flamingos for this card.


I used a permanent double-sided tape runner to first adhere the strip of flamingos onto the hot pink cardstock, and then I adhered the hot pink cardstock to the card front. Again, the strips of paper hung over an edge of the card base which I cut off with scissors.
Card #2: Decorating the Inside of the Card
For this card, I wanted to add some visual element to the inside of the card front. I flipped through my Tropic Vacation Hot Buy paper pack until I found a sheet with a variety of design strips. At the bottom of the sheet was a blue strip with a flock of flamingos that matched the flock of flamingos on the card front.


I cut the small strip of flamingos down to 6-1/4" in length. Since I still had excess of the gradient sheet due to creating a nontraditional greeting card size, I cut it down to a size slightly larger than the small strip of flamingos.
I adhered the strip of flamingos onto the gradient sheet, and then I adhered the gradient sheet to the inside of the card front. I cut the excess strips of paper that hung over an edge of the card base with scissors.
Card #2: Decorating the Envelope
I again used the excess part of the pink sheet that had the flock of flamingos across the bottom for decorating the inside of this envelope.


This time around, I placed the sheet over the envelope, also covering the entire flap, flipped both the sheet and envelope over, and then used my pencil to mark on the sheet where I wanted to score it. Once I folded the sheet, I cut it at 90 degrees at both ends of the fold.


I placed the envelope over the sheet and made pencil marks to determine where additional cuts were needed. Once I got the shape right, and the sheet fit well inside the envelope, I adhered the sheet to the envelope's flap only.
I cut the excess sheet that hung over the envelope's flap. This attempt to decorate the inside of the envelope was much easier than the attempt I made for the first card. However, this meant that I covered the sticky part of the envelope's flap that you wet to seal the envelope.


I added permanent double-sided tear tape to the outer edges of the envelope's flap. I left the backing on the side of the tape that would seal the envelope. This will allow me to peel the backing and seal the envelope when I'm ready to send this greeting card to someone special.
My Thoughts


Overall, I thought the first card and envelope design looked good. I'm glad I added the sentiment to the card front and decorated the inside of the envelope.
However, making this greeting card reminded me that I need to continue practicing brush lettering and heat embossing. Hopefully with practice I'll get better.


The second greeting card was easier to make despite the nontraditional size I worked with. It doesn't look fancy, and I didn't add a sentiment, but it's a decent blank greeting card that's ready when I choose to send a message to someone special.
What's Next?
I made a birthday greeting card with a window for another friend. I recorded the process, but I'm not sure I'll write it up as a blog post. In case I don't blog about that greeting card creation, check-out my YouTube channel to see what I did and the hiccups I encountered.
If this post inspired you to make your own greeting card, Login and Sign up to share your creations. I'd love to see and be inspired by your creativity!
If you're interested in future card making posts, subscribe below to be notified when those and other posts are available.
Thanks, and have a great day!
Simply Jelly Jam
Σχόλια