Making Easter Cards
- Simply Jelly Jam
- Apr 7, 2020
- 7 min read
Updated: Nov 9, 2020
Egg-themed Easter cards for family and friends.
I wanted to make Easter cards for my family and friends since I won't see them in-person this holiday. I used this crafting opportunity to practice using watercolor, as I did when I was Making a Thank You Card last week.
This time I pulled out my Cricut Maker to cutout egg-shaped stencils. I also used some blank watercolor cards and envelopes I bought years ago.
Don't worry. I'm not going to use any egg puns in this post. I eggs-hausted all I could come up with in My Journal Spread for April 2020 post.
Continue reading to see the steps I took to create a handmade Easter card.
Supplies and Stuff
These are the items I used to create my card:
Blank watercolor cards and envelopes. Unfortunately, I don't remember where I bought the box set or how much it cost. The cards, which didn't fold, were roughly 6" x 3" each. I found a similar Strathmore Blank Watercolor Cards with Envelopes box set on Hobby Lobby's website if you're interested.
Cricut Maker, Cricut Design Space, and Cricut Stencil Vinyl. I didn't feel like I could hand draw an egg well, even though it's a simple shape to draw. I decided to use my Cricut to cutout reusable egg-shaped stencils.
Watercolor paint markers. I used Watercolor Dual Tip Markers by Artist's Loft, sold at Michaels. I used yellow, pink, blue, and green for this card design.
Tombow Dual Brush Pen. Because I didn't have an orange watercolor paint marker, I used an orange Tombow Dual Brush Pen. Since the Tombow pen I have is water-based, it worked the same as the watercolor paint markers.
Paintbrush. I used a paintbrush to apply diluted watercolor paints to the paper using a wet-on-wet technique. I also used a paintbrush to dilute watercolor paints drawn directly onto the card.
Water. I used water to apply and dilute my watercolors.
Palette. When I didn't use the watercolor paint markers directly on the card or envelope, I "scribbled" the markers onto a palette. In this case, I just used an old food container lid.
Using My Cricut Maker
I knew I wanted an egg-themed design for my cards and envelopes. It's the theme I did for my personal journal, and I thought it would be quick and simple enough to create 5 different designs.
I knew I'd end up with an oddly shaped egg if I drew it freehand, so drawing it was out of the question. I had some Cricut Stencil Vinyl I've yet to use, so I went online and downloaded an egg silhouette to turn into a simple stencil.
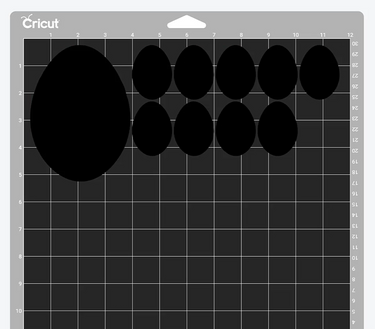
I opened Cricut Design Space and uploaded the egg silhouette image as a cut file. I duplicated the image, creating 9 egg shapes at 2" in height. I also had a single egg at 5" in height because I failed to measure my cards beforehand. The 5" in height is perfect for use with an A2 size greeting card.

Even though I used my Cricut Maker, the stencil vinyl is thin enough to use in a Cricut Explore Air machine with a regular blade. I made sure the correct material was selected in the Cricut Design Space. I cut the stencil vinyl down to the right size and placed it onto a light grip mat.
Painting the Backgrounds

I placed an egg-shaped piece of stencil vinyl on each card and envelope. My thought was to have a soft, pastel watercolor background and a more vivid color for the egg in the foreground. Since I was working with an envelope made of watercolor paper, I felt comfortable using a wet medium on it.
I didn't care about where I placed the stencils on the cards. I played around with a few different layouts to see how they turned out. Yet since I was mailing 4 of the 5 cards I created, I placed the stencils towards the bottom-left of the envelopes. I wanted to make sure I had enough blank space to clearly write the recipient's name and address. I wrote my own name and address on the back flap of the envelopes since USPS only needs to see the recipient's information on the front.
I was taught long ago to start with the background first, so I did that for all 5 cards and envelopes I was crafting.

I scribbled blue, pink, and green watercolor paint markers onto my palette. I added a few drops of water to each color scribble using my round brush. This diluted the paint enough for me to easily lift the colors off the palette with the brush.
I used a wet-on-wet technique to apply the diluted watercolor background right over the stencil and onto the paper. In this technique, I dampened the paper with a wet brush. I then used the same brush to begin applying colors onto the paper. Because the paper was damp and the watercolor paint was diluted, the background design had soft edges from the colors spreading over the wet area. It created the soft pastel look I hoped for.

On one of the cards and envelopes, I thought I'd try something different and use a cutout part of the stencil vinyl after I pulled the egg shape piece out. I used the same wet-on-wet technique inside the stencil because I was curious to see how it turned out. Spoiler: I think it turned out OK.

I worked on the background for all cards and envelopes in one sitting. Once I finished the backgrounds, I used a heat gun to speed up the drying process. I used a paper towel to dab off water, as a little bit of water pooled in the curled pockets of the paper.
Painting the Eggs in the Foreground
With the background dry, I thought I'd try using the marker directly on the paper for a more vibrant color. I wanted the eggs to pop against the background. At first, I didn't think it would work out based on past experiences I had trying this technique, but it apparently worked in this case.
After I used the marker directly onto the paper, I used my damp paintbrush to blend the colors, creating the watercolor look. After doing so with the first egg, I didn't feel like it popped against the background well enough, so I decided to add some shading to the eggs.
I didn't have an orange watercolor paint marker, so I improvised with a Tombow Dual Brush Pen. Cheap amateur tip: if a pen or marker is water-based, there's a good chance that it'll work as well as watercolor paints. So, if you want to try watercolor painting for the first time and don't have/want watercolor paints, check to see if you have water-based pens or markers and start experimenting.

For a couple cards and envelopes, I experimented with adding grass below and alongside the eggs. I thought it would help the eggs pop against the background even more. I believe it helped do just that, and I now regret not doing it for all cards and envelopes.
As I did after painting the backgrounds, I used my heat gun to speed up the drying process.
Flattening the Cards and Envelopes

Naturally, the cards and envelopes were warped due to the amount of water and diluted watercolor paints I used. I tried bending each by hand, but that didn't work out.
I stacked the cards and envelopes together and placed the heaviest book I had right on top. I didn't know if this would work, but I left it alone for a couple hours.

After a couple hours, the cards and envelopes were flatter from the weight of the book. There were a few I still had to bend, but this time they remained flat.
My Thoughts

I had 3 regrets after finishing this card crafting project. My biggest regret is not trying to protect the painted designs, at least on the envelopes. I did test applying Mod Podge over the painted portion of the envelope for my mail carrier, but I didn't like the uneven look of my application of the Mod Podge.
I didn't want to cover the entire front of the envelope with Mod Podge. I know you're not supposed to cover the stamps with anything, not even a matte coat, because it would make the stamp invalid. I also didn't want to cover the entire front of the envelope prior to placing the stamp because I didn't know if the stamp would adhere well over the Mod Podge.
I didn't feel comfortable testing other options I have at home, mainly because I didn't want to risk wasting stamps or somehow voiding the stamps that prevent the cards from being delivered. So, I left the envelopes as is and hoped for the best. It would be my luck that it rains the day the cards are delivered.
My second regret was not trying to make the multi-colored egg pop off the page more. The pastel colors appear to fade into the white background in my eyes. I left it as is because I was worried about messing it up further, since this was the last watercolor card and envelope pair I had. I could've made my own card and envelope using my Canson watercolor paper, but I was too lazy to take the time to do that.
My third regret was not adding grass to all the designs. My favorite card is the one with the blue and yellow eggs, paired with the pink egg on the envelope. I think this is my favorite because of the grass. My least favorite card and envelope are the ones with the multi-colored egg, but I still like it because of the grass. All other eggs appear to be floating in a psychedelic space vortex.
Otherwise, I loved how they turned out! I don't usually like my crafts, but I loved these cards because of how simple and colorful they were to make. I'm glad I recorded it because otherwise I wouldn't have any imagery to share. This started as an experiment that surprisingly turned out well. I only hope my family and friends like it as well as I do.
What's Next?
I've been working on several craft projects that I'm "egg-cited" to share with you soon! After all, art and crafting come before housework in the dictionary. Sometimes it's important to do things in alphabetical order.
If this post inspired you to make your Easter cards, Login and Sign up to share your creations. If you're interested in future card making other "artsy" posts, subscribe below to be notified when they're available.
Thanks, and have a great day!
Simply Jelly Jam


Comments