Quick Father's Day Card
- Simply Jelly Jam
- Jun 16, 2020
- 4 min read
Updated: Nov 11, 2020
A quick Father's Day card design (<10min).
I wanted to make my brother a card for Father's Day. I've hoarded paper pads for a long time, and now was a great opportunity to use some sheets from a Whiskey Barrel Hot Buy paper pad.
Continue reading to see the steps I took to create a handmade thank you card.
Supplies and Stuff

These are the items I used to create my card:
Paper trimmer and score tool. I used a paper trimmer to measure, cut, and score the paper. A simple pair of scissors and a ruler will do the same if you want to try this at home. You also don't need a score tool. A simple fold of the cut paper in half will do the job. Then use your finger or some other tool, like the scissors' handle, to flatten the fold if preferred.
Heavy cardstock paper. I used brown, heavy cardstock because some cardstock is too flimsy to work as a card base.
Patterned cardstock paper. I used a couple sheets from a Whiskey Barrel Hot Buy paper pad from Michael's.
Pencil and brush marker. I used a pencil and Tombow black brush marker to write the sentiment on the front of the card.
Double-sided tape. I used a permanent tape runner to adhere the different pieces of paper onto the card and envelope.
Envelope. I used white, A2 sized envelope to mailing the card to my brother.
Scissors. I used scissors to cut the ribbon down to size and trim excess paper.
Ribbon. I used some ribbon to make a simple bow and add texture to the card front.
Glue. I used E-6000 to adhere the ribbon onto the card front.
Measure, Cut, and Score the Card Base

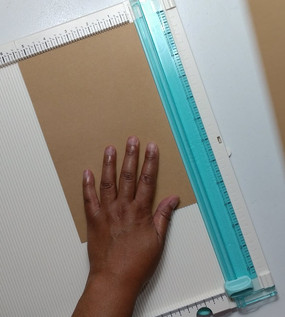


I cut a sheet of heavy cardstock down to 8-1/2" x 5-1/2", then scored it at 4-1/4" to create a clean card fold. I used the score tool to flatten the fold.
This piece of paper served as the card base. I then pulled out 2 sheets of patterned paper to use as strips of an accent to the card and envelope.
Decorating the Card Front


For the front of the card, I cut one sheet (leafy design pattern) down to 4-1/4" x 1-1/2" and another sheet (log design pattern) down to 4-1/4" x 1-1/4".
Using the tape runner, I adhered the log design horizontally over the leafy design, then adhered the leafy design horizontally onto the card front. I didn't measure how far down from the top I wanted the strips to be located. I just placed it where it looked alright knowing I'd write a sentiment later.


Because my penmanship isn't the best, I did an image search for "Father's Day text." After I found a font style I thought I could replicate, I used a pencil to sketch that style onto the card front.
I traced my lettering with a black Tombow brush marker. I figured this was a good way to practice brush lettering. I made sure to apply more pressure on my down strokes and light pressure on my upward strokes.


I cut a strip of ribbon slightly longer than the card front is wide. I used the tape runner to adhere the ribbon flat over the pattern paper, and then trimmed the excess with the scissors.
I then cut a piece of ribbon to tie into a bow, but I accidentally cut it too small. I ended up tying a bow before cutting it off the roll. That made it easier to make sure I had just enough ribbon to work with.
I used E-6000 glue to adhere the bow onto the card front. I applied glue onto several areas of the bow because I didn't want it to fall off or become untied at any time. I've tried using tape in the past, but it doesn't hold as well as glue does.
Decorating the Inside of the Card


For the inside of the card, I cut a thin strip of each sheet of pattern paper. I didn't measure it, but I'd guess they were no more than 3/4" wide. The length didn't matter to me because I knew I'd trim them.
I adhered the log design over the leafy design with it overlapping slightly. I played around with the placement before deciding to place them angled towards the bottom-left and top-right of the inside of the card. Once I adhered those strips in place, I trimmed the excess along the edges of the card base.
Decorating the Envelope
For the envelope, I cut 1" wide strips of each pattern paper. I adhered the leafy design vertically towards the left side of the envelope. I then adhered the log design vertically over the leafy design with it overlapping slightly. I trimmed the excess paper along the edge of the envelope.
I placed the strips towards the left of the envelope because I knew I needed enough space for my brother's address. I added my address on the back flap of the envelope.
My Thoughts

This isn't the best card I've made, but it's a decent card that took less than 10 minutes to put together. Hopefully he likes it and knows how much I love him.
I got it in the mailbox in time for it to get to his house before Father's Day on June 21st. Then I remembered he's in Florida visiting family, so... at least it'll be a pleasant surprise when he gets back home. I'll speak with him on Sunday anyway.
NOVICE TIP: If, after using the tape runner, some of the tape 'hangs' over the edge of the paper or ribbon, use your finger to fold the tape over onto itself. No tape's wasted or showing after adhering the item onto the card base.
What's Next?
My Dad's not big on receiving cards, so I'll do something else to celebrate his special day. Unfortunately, I'm torn between cutting out a t-shirt design with my Cricut Maker, sculpting a figurine from polymer clay, cooking a meal, or something different. If it's something crafty, I probably won't be able to share it in a blog post or YouTube video before this Sunday.
If this post inspired you to make your own thank you card, Login and Sign up to share your creations. I'd love to see and be inspired by your creativity!
If you're interested in future card making posts, subscribe below to be notified when those and other posts are available.
Thanks, and have a great day!
Simply Jelly Jam
Comments