Trying My New Foil Quill Freestyle Pens
- Simply Jelly Jam
- Sep 6, 2022
- 5 min read
I need more practice, but it was easy to get started.
I recently tried using the We R Memory Foil Quill Freestyle Starter Kit for the first time. It was easy to get started and use, but I need more practice for better results.
In case it's helpful, below are the topics covered in this post:
Package Contents


This foil quill freestyle pens kit (corded) was one of several products I purchased during My July 2022 Prime Day Haul. There is also a cordless foil quill pen with changeable tips sold through various sellers. I did not see any freestyle products available on We R Memory Keepers website.
The "freestyle" part of the product means it works independently of other products. I did not buy the kit that connects to an electronic die cutting machine like the Cricut Maker.


The package contents included:
Instruction sheet
Fine tip quill pen (0.5mm)
Standard tip quill pen (1.5mm)
Bold tip quill pen (2.5mm)
Washi tape roll
Silver foil roll (15cm x 22cm)
Gold foil roll (15cm x 22cm)
Rose gold foil roll (15cm x 22cm)
The Pens


Each pen in this kit is corded and requires power to operate. They have a USB-A end to connect to a power source with the appropriate port. I opted to use my portable battery bank to keep it close by for convenience.
Once plugged in, a light illuminates at the end of the pen to indicate it is receiving power. The instructions stated the pens needed to be heated for five minutes.
The colored grip of a pen is a cool way to hold it... literally. The white part of the pen's case between the grip and tip gets warm. The tip is unbearably hot, but not as hot as the tip of a wood burning iron gets. Unlike my First Time Trying Pyrography, I did not feel the need to wear gloves to protect my fingers from the heat.
I accidentally touched the bold pen tip and did not get burned. The tip did not leave a mark on my skin. The heat got my undivided attention, though!
First Attempt


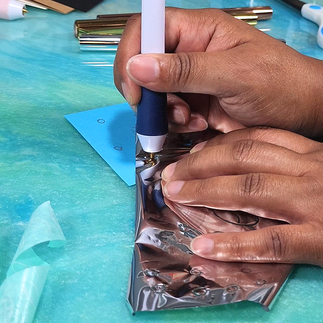
I only used the bold tip quill pen for my first attempt. I wanted to get a feel for how to use a pen properly, not how thick the lines would be. I could focus on which pen tip to use for different things another time. Since this was the first attempt, I knew it would likely fail.
I experimented with speed while tracing a word over foil and onto cardstock paper. For the first couple letters of the word "hello," I pushed the pen's tip at what felt like a ridiculously slow speed. It felt so slow, I sped things up a little for the last three letters of the word.
I was not sure if having the tracing paper as an added layer would impact the foiling process. I did not know if there was enough heat from the pen tip to heat through the tracing paper and foil to burn onto the cardstock at the bottom.
After my initial tracing the lines of the word, I removed the tracing paper and went over the lines directly on the foil.


Despite going over everything twice, there were breaks in the lines of the last three letters with the very last letter looking the most incomplete.
I mistakenly placed the foil back down and retraced the word. The retraced lines did not align with the initial lines. This resulted in unwanted line duplication. I hated the way it looked.
Still, I went ahead and doodled some circles using the left-over foil with hopes of making the design look better. It did not look better. I then attempted to fill-in the gaps between the duplicate lines. It still looked bad. This was my least favorite of the three attempts.
Second Attempt


This time I used the bold and standard tip quill pens. I focused on maintaining a slow, steady speed. I just wanted to do better than the first attempt.

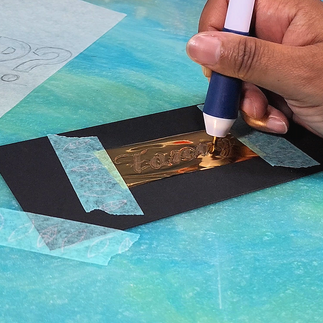


I used the standard tip quill pen to outline the letters of the word "Fancy." After I removed the tracing paper, I again went over the lines of the word.
I switched to the bold tip quill pen to fill-in the thicker areas of the letters. The larger tip made it easier to cover more area than the standard tip.
Much better! The word did not need any touch ups. I added some dots using the left-over foil for the fun of it. It was a simple way to add visual elements to an otherwise plain background.
This was my favorite of the three attempts. It is not great by any means, but I love the look of gold on black. Something about the color combination says "fancy" to me! (Sorry, I could not help myself with that lame joke.)
Third Attempt


I again used the bold and standard tip quill pens. I was curious to see if I could do this last attempt at a lightly faster speed than the previous attempt.


I used the standard tip quill pen to outline the letters of the word "thanks." After I removed the tracing paper, I again went over the lines of the word.
I switched to the bold tip quill pen to fill-in the thicker areas of the letters. The larger tip made it easier to cover more area than the standard tip.


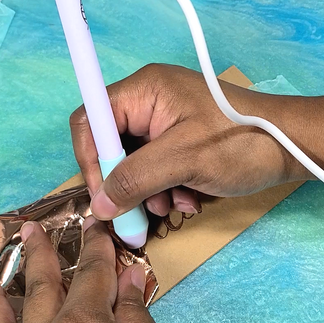


I thought I could use the bold tip quill pen a litter quicker than the standard tip, but that was not the case. The thicker parts of the letters were not filled-in completely.
Instead of using the left-over foil to add shapes to the background, I used it to fill-in the gaps of the letters. It was tricky not being able to see if I was filling in a gap or adding a mark outside of the lines, but I somehow managed to do an OK job.
The gaps along with my weak brush lettering skills makes puts this design on my "ew, yuck" list.
My Thoughts

Slow is key! At least, that is the main lesson I learned from my first three attempts using the foil quill pens. When done properly, the foil on paper looked good. I always liked an added shine to handmade projects.
Learning to use the pens was quick and easy. Learning to use it properly and well will take several more attempts. This is something I see myself using more than once, so it was worth the cost to me.
What's Next?
The foil quill pens may work on other materials. Since I bought additional foil sheets, I will one day attempt to foil wood and other materials.
To foil, or not to foil? Comment below to share your experience or concerns with using a foil quill.
Don't forget to subscribe below to be notified by email when I post something new.
Thanks, and have a great day!
Simply Jelly Jam
Comments