Valentine Greeting Cards
- Simply Jelly Jam

- Feb 9, 2021
- 6 min read
Making greeting cards from my "Be My Valentine" Hot Buy paper pack.
I made five A2-sized greeting cards from a "Be My Valentine" Hot Buy paper pack. I originally meant to make one or two cards only, but the smaller designs of the paper pack made it quick and easy to make more.
Supplies and Stuff


These are the items I used to create my cards:
Paper cutter and score tool
Scissors
Various pre-scored A2 cardstock
White cardstock paper
"Be My Valentine" Hot Buy paper pack
"Embossed Foil" paper pad (Card #1 only)
Double-sided permanent tape
Foam tape
Heart stamp
Various stamp ink colors
Note About Pre-Scored Cardstock


I used pre-scored A2 cards for four of the five cards presented in this blog post. If you're making your own card bases like I did for Card #3: "Together Forever" on Pattern Sheet Card Base, you can cut heavy cardstock down to 8-1/2" by 5-1/1". Score down the center longways at 4-1/4". In case I didn't explain that well enough, refer to the diagram image above.
Card #1: "Be Mine" on Black Card Base
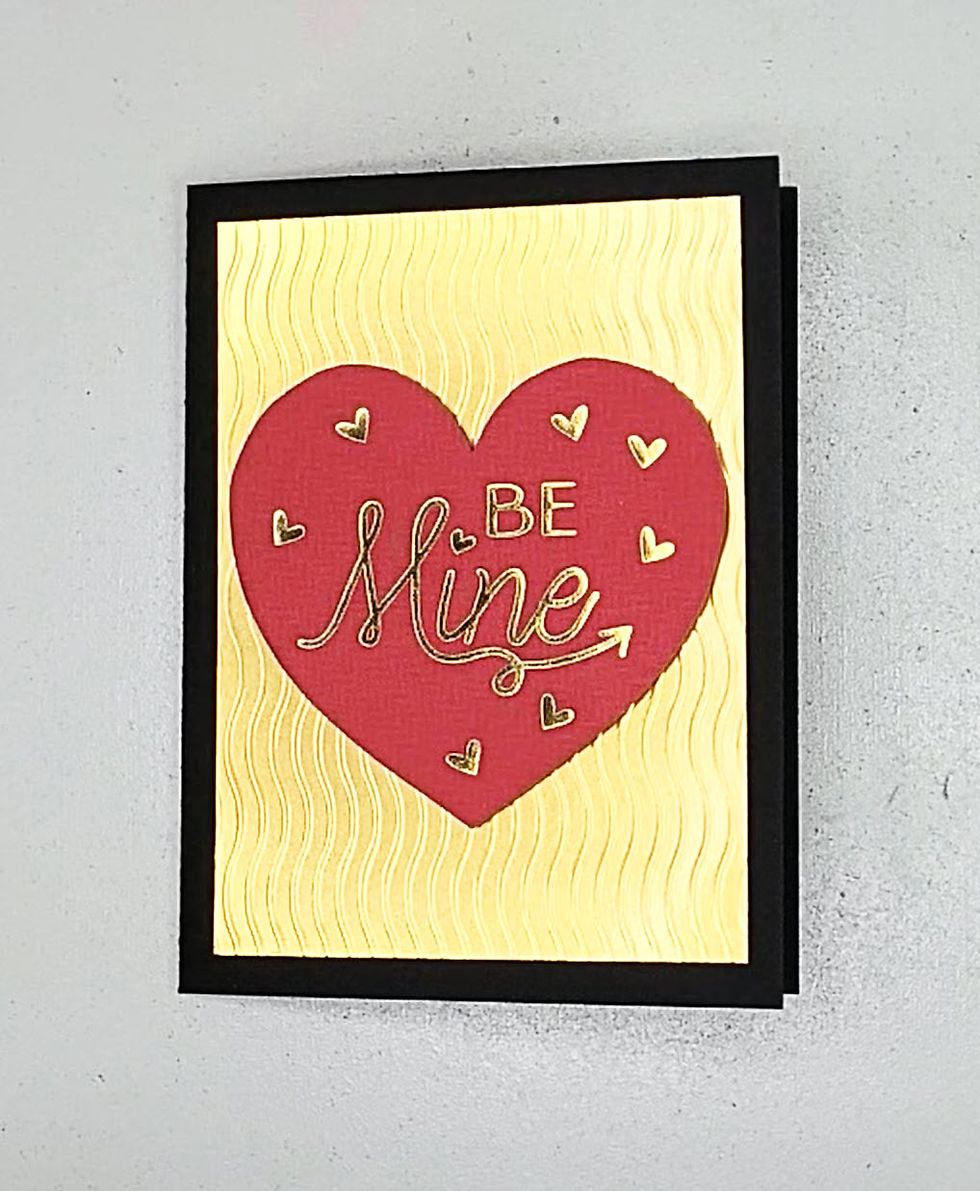
Since I started attempting to hand make my own greeting cards a few years ago, I found that I love metallic over a black base. When I saw the small "Be Mine" red and metallic gold design on one of the sheets in the paper pack, I immediately thought about adhering it on a black card base.
Unfortunately, while I attempted to trim the sides to have the small design fit within the confines of the card front, I accidentally trimmed too much of the metallic gold and a part of the red heart.
To fix my error, I used scissors to cut out the heart shape by itself. I then pulled out a metallic gold sheet from my "Embossed Foil" paper pad I bought from Hobby Lobby years ago. If I didn't have a metallic sheet I could've used behind the red heart, I either would've painted the card front with gold acrylic paint or just simply adhered the red heart to the card front all by itself.
I adhered the metallic gold sheet with my permanent double-sided tape. I then adhered the heart shape with foam tape to add some depth and dimension to the card front.

I wasn't sure what to do with the inside of the card. I cut a small plain white cardstock down to 3-3/4" by 5". I cut the excess metallic gold into two thin strips and adhered them to the top and bottom of the white cardstock.
I stamped a couple small heart shapes to the bottom-right of the white cardstock.
Because the left interior side of the card looked too plain to me, I cut and adhered a small "XOXO" red heart and metallic gold design to match the design on the front of the card.
Card #2: "You Are My Cupcake" on Red Card Base

The "You Are My Cupcake" small design featured a lot of red, so I thought it was fitting to adhere it over a red card base. I trimmed the sides of the small design enough to allow for the red card base to show on either side of the design.

For the inside of the card, I cut a multi-heart pattern sheet down to 4" by 5-1/4" and excess white cardstock down to 3-3/4" by 5". I adhered the white cardstock over the multi-heart pattern sheet, and then I adhered the multi-heart pattern sheet on the inside left half of the card base.
I again stamped a couple small heart shapes to the bottom-right of the white cardstock.
Card #3: "Together Forever" on Pattern Sheet Card Base

I've bragged in past blog posts about how I love using the small designs of paper packs for hand making cards. However, I rarely brag about some of the full-page designs that I like to cut down for use as an A2 sized card.


That was the case with a pink full-page design that featured an envelope surrounded by various hearts. I cut the sheet down to an A2 sized card making sure to not cut the envelope and hearts design I liked so much. I initially wasn't sure if I wanted to use it as the interior or exterior design of the card.
I decided to use it as the interior design of the card. I cut the excess pink of the full-page design down to 4-1/4" by 5-1/2" to fully cover the card front. I also selected the "Together Forever" small design for the card front since it features a couple envelopes and colors that matched the design inside.
This small design was the same size and came from the same sheet as the "You Are My Cupcake" small design I used for Card #3. I trimmed the sides as I did with the last card. This time instead of using my permanent double-sided tape to adhere the design to the card front, I used foam tape to add some depth and dimension.
Card #4: "You're My Favorite" on Purple Card Base

Since there were some subtle purple hearts on the "You're My Favorite" small design, I chose a purple card base for the design to be adhered onto. I trimmed the sides and adhered it the way I did with Card #2. After all, this small design was the same size and came from the same sheet as the small designs I used for the last couple cards.

I thought I'd use excess of the multi-heart pattern sheet I used for Card #2 on both interior sides of this card. I didn't measure or give this a lot of thought. I just knew I wanted to do something different, so this was really an experiment for me.
After adhering the trimmed multi-heart pattern sheet inside the card, I cut a heart-shaped balloons small design to go over the left interior of the card. I then used the small design to determine the size for the white cardstock to go on the right interior of the card.
I again stamped a couple small heart shapes to the bottom-right of the white cardstock.
This was my least favorite interior card design because it looks too busy for my liking. Yet, I'm glad I tried something a little different to know I don't want to do it again.
Card #5: "Happy Valentine's Day" on White Card Base
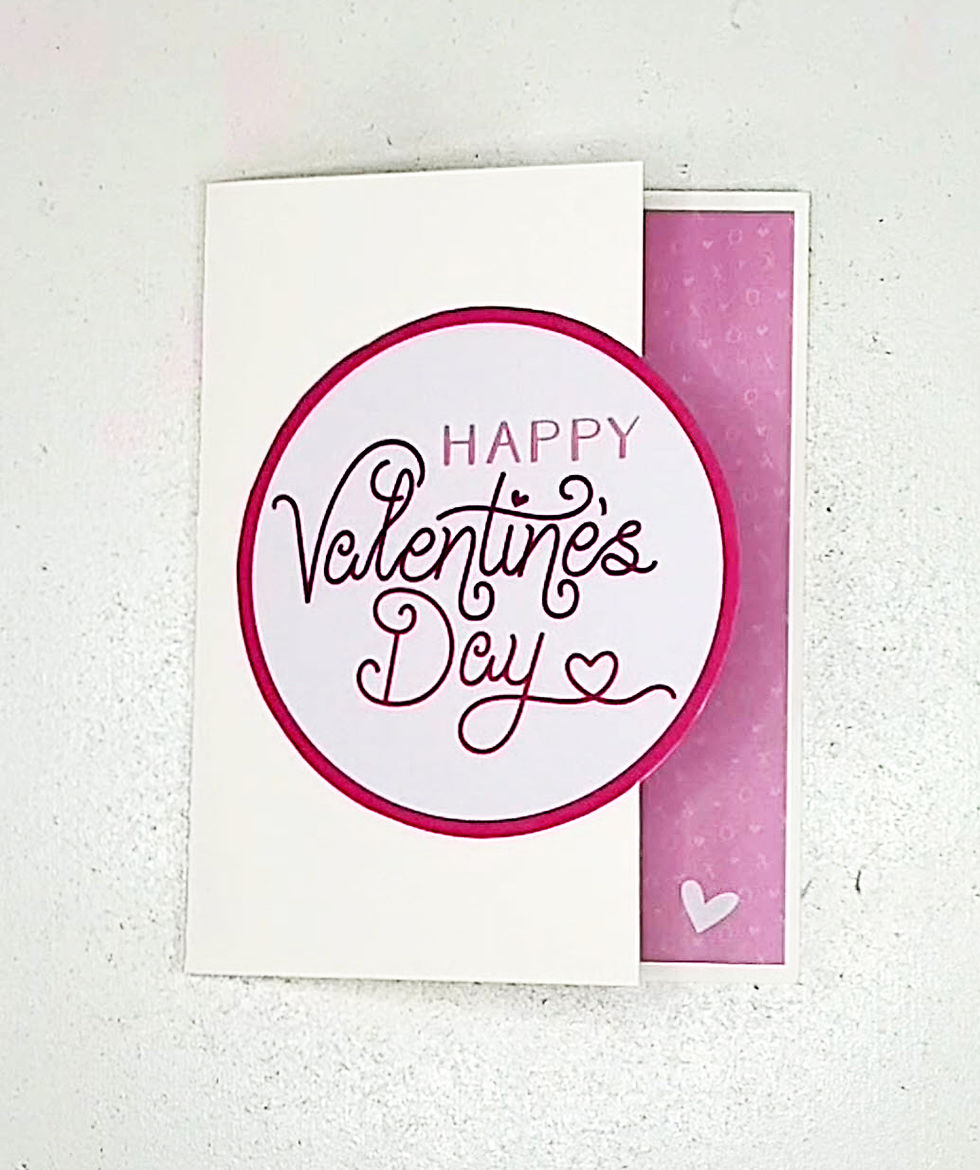
I selected the "Happy Valentine's Day" small design and excess pink of the full-page design from Card #3 for the card front and right interior of this last card.
I cut the excess pink piece down to 4" by 5-1/4" for the right inside of the card. This piece had a white heart towards the bottom-right corner. I thought it'd be nice to be able to see it when the card's closed. I chose a white card base and cut approximately a third off the card front, just enough to see the white heart of the interior design.
Instead of using the entire "Happy Valentine's Day" small design for the card front, I cut out the circular part of the design like how I cut out the red heart for Card #1. I adhered it to the card front and loved the way it looked over the pink strip behind it.


However, I didn't like how the interior left half of the card looked plain and empty. I placed excess multi-heart pattern sheet I used for Cards #2 and 4 over the part of the round design that protruded over the card front and used a pencil to trace a circle. I used scissors to cut it and adhered it to the interior left half of the card directly behind the round design of the card front.
While the rounded multi-heart pattern sheet looked good on its own, I went ahead and cut a small "cutie" red heart and metallic gold design in a smaller round shape. I then adhered it to the center of the rounded multi-heart pattern sheet.
My Thoughts

I love using sheets from paper packs that include small designs that I can slap onto the front of a card base. Card making is often quick and easy for me, but that's because I search for inspiration and practice card making whenever I can.
This paper pack includes so many small designs that made it easy for me to make quick cards I could give to a special Valentine one day in the future when I have one.
Don't forget to check out the video highlighting the steps I took to make all five cards linked at the top of this blog post.
Hopefully, you can refer to these images and video, along with others you find elsewhere on the Web, for planning the design of your next handmade greeting card.
What's Next?
I tried creating several Valentine-inspired craft projects recently, but most didn't turn out well. Hopefully, I'll have one more Valentine project to share with you on Thursday. If not, I'll probably write about "Satisfied Staying Single Day" or something else related to the upcoming holiday.
If this post inspired you to make your own greeting card, Login and Sign up to share your creations. I'd love to see and be inspired by your creativity!
If you're interested in future card making posts, subscribe below to be notified when those and other posts are available.
Thanks, and have a great day!
Simply Jelly Jam


Comments